Bring Structure to Your Logs with Custom Parsing on LogDNA


Picture a perfect world where all logs shared the same layout, format, and structure. Every application, programming language, and logging framework created logs that were verbose, yet easily parsable. Of course, we don't live in this ideal world, and so we're stuck with dozens or even hundreds of various log formats. While LogDNA supports a large number of common log formats, there are formats out there that our automatic parsing engine won't recognize. And when that happens, we want you to still have the ability to parse, index, and search your logs. This is where custom parsing will come in!
We recently announced our custom log parsing feature, which lets you create your own parsing rules using an intuitive step-by-step wizard. In this article, we'll take a closer look at the custom parser and how you can use it to parse your unstructured log data.
PS. We love Charity's latest blog post on logs vs structured events and encourage you to read it too.
Why not Regex?
ELK users are likely familiar with Grok, a Logstash plugin capable of parsing almost any log format, from backup software logs to hardware router logs. As a Logstash plugin, Grok is commonly used in Elastic Stack deployments to handle unique log types before passing them to Elasticsearch.
This raises the question: if Grok is something developers are familiar with, why doesn't LogDNA take a similar approach?
The answer is in Grok's configuration. While Grok offers predefined patterns for common values like usernames and email addresses, these patterns are ultimately built on regular expressions. Regular expressions (or regex) is a language for describing complex search patterns. Using regex, you can search a block of text for any combination of characters, symbols, words, phrases, and more. This flexibility is what makes regex such a popular choice for parsers, but it also makes regex difficult to use.
The problem with regex is that it can be too complex. Because it's designed to handle any and all possible text combinations, its syntax is both concise and complicated. To understand how an expression works, you either need an in-depth knowledge of the language itself or a regex debugger to break down the steps for you. As an example, the following expression is used to match email addresses. Without knowing the different operators, modifies, and how they interact with each other, it's extremely difficult for a developer to know how this works at a glance:
[a-zA-Z0-9-.!#$%&'*+\/=?^_`{|}~]+@[a-zA-Z0-9-]+\.[a-zA-Z0-9]{2,3}
In addition, regex is inefficient at scale. Running this expression against a small log involves nearly 500 operations. This might not seem like much, but imagine running this same expression on millions of events per minute. This can quickly lead to performance problems and even denial of service attacks.
LogDNA wanted to make it dead simple for our users to to add non-standard log formats, run custom transformations on your logs without adding a layer of regex to debug.
Custom Parsing with LogDNA
LogDNA takes a more visual approach to defining custom parsing rules. We created a step-by-step wizard that walks you through the process of splitting (or tokenizing) your logs into separate fields and extracting those fields. You have full control over how your logs are tokenized and how each field is formatted, without the frustration of writing regex. In addition, you can see the effect of each operation on your logs in real-time.
Example: Using LogDNA to Parse Squid Logs
To show how the custom parser works, we'll ingest and parse access logs from Squid, a popular open source reverse proxy and caching server. Squid's access log records each request handled by Squid and includes data such as the request method, the status of the request, whether the request hit or missed the cache, and more.
The following is an example of a Squid log. You can learn more about the contents and structure of the log on the Squid Wiki.
1548174736.822 6 127.0.0.1 TCP_MISS/200 729 POST http://localhost/ajaxBuildQueue - FIRSTUP_PARENT/10.152.183.162 text/html
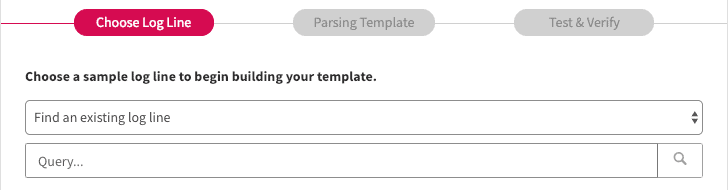
Step 1: Select Your Reference Logs
To start, open the LogDNA web app and navigate to Settings > Parsing. Click Create New Template to start drafting a new template. Before you can begin editing the template, you will need to provide a sample log by either searching for events in LogDNA, or by manually entering a log. Since we're already sending our Squid logs to LogDNA, we'll search for events using a query:

Now that we have a sample log, we can create the rule that tells LogDNA how to parse log data.
Step 2: Create the Parsing Template
Next, click Build Parsing Template to open the template editor. Start by specifying the delimiter used to split the log into its individual fields. With Squid, this step is straightforward since the access log uses a space as the delimiter:

Under the extraction, box is the operator box, where you can specify how fields are processed and indexed by LogDNA. The custom parser includes several operations including converting a field to a number, trimming whitespace, or splitting the field into additional fields. You can also chain operations together to perform multiple operations, such as splitting a field and converting the results to numbers.
We'll need to add several operations in order to match the Squid native format. For combined fields such as code/status, we'll chain operations to split and capture each subfield. For numeric values such as status codes, we'll convert the field to a number before capturing it.
The following image shows the operations used to extract the code/status field. We start by adding a second extraction operation, which splits the field into two new fields: TCP_MISS and 200. We'll store TCP_MISS in a field named code, and we'll convert 200 to a number before storing it in a field named status. We'll repeat this process until each unique data point is stored in its own field. To the left of the operation boxes is a chart showing the complete hierarchical chain of operations:
After adding all the necessary options, you can verify that your rule works by checking it against the sample log:
Now, you will need to confirm the template's accuracy by testing it against additional log events. Click Proceed to Validation to continue.
Step 3: Validate the Template
Although you validated your template against a sample, this doesn't guarantee that the template will work for all logs. The validation step runs your template against several test logs to verify that it's parsing them correctly. For each log, click Mark as Valid if the extracted fields are correct, otherwise, click Mark as Invalid to return to the template editor. If all of the lines are parsed correctly, you can scroll to the bottom of the page and click Validate All.
Step 4: Active the Template
After validation, click Activate to apply the new template. The template will start parsing logs that match the query you defined in step 1. After a few minutes, you can expand a log in the LogDNA web app and see each individually parsed field:
Reviewing Your Template with Minimap
You can always come back and review your Parsing Template by finding the template in your template list and clicking on "Parsing template"

On the left you'll see an index map of your rules, you can hover over to see the action of each part of your rules and you can also click on any of the nodes to see the details of the rules you've created and the details of the delimiters and fields.
Conclusion
The custom parser allows us to support almost any log type, format, or structure. With just a few clicks, you can convert even the most unruly logs into searchable, graphable data. To get started with custom parsing, log into your LogDNA account and click Settings > Parsing, or visit the documentation. If you would like additional help or have a specific use case, feel free to contact us.